Saturday, December 24, 2011

'Tis the Season to be Thankful

Another year is almost over and a new one is just around the corner. Christmas is so wonderfully placed at the end so we can all close the year well with gift-giving and spending time with our loved ones. I guess most of you are still busy with your year-end holiday crafting of cards and gifts...and I hope all your shopping, baking, wrapping and party planning are going well according to plan :)

For me personally, Christmas is much more of a time to reflect on the real Reason for the Season, where a Savior was born in a manger 2000 years ago so He could be Lord of our lives evermore. I take the opportunity of this blessed season to be thankful for that and for all the wonderful blessings through the year.


For unto you is born this day in the city of David a Savior, who is Christ the Lord.  
Luke 2:11

So in  the spirit of the season, I hope you will indulge me and allow me to share some festive pics...


This Santa wannabe here is Mr Wooloomooloo, my bedtime buddy, I can't sleep without him hehe. This photo was actually taken 2 years back. I was alot more industrious with Christmas decor etc before the baby came along hehe.


I always try baking something special over the past few Christmases (again, before baby came along!) These were some jam cupcakes I made for one of my elaborate Christmas eve dinners. This year, everything is store bought and we're eating OUT! LOL!

Well, alas, I'm sad to say we're not even putting up a tree this year cos Lucas is in his WALKING and PULLING DOWN EVERYTHING stage so a big tree full of shiny ornaments is a major baby hazard! Unlike previous years, I won't be whipping up a massive feast either LOL! I guess Lucas and my scrap work has taken way too much out of me. Perhaps next year... who knows... :)


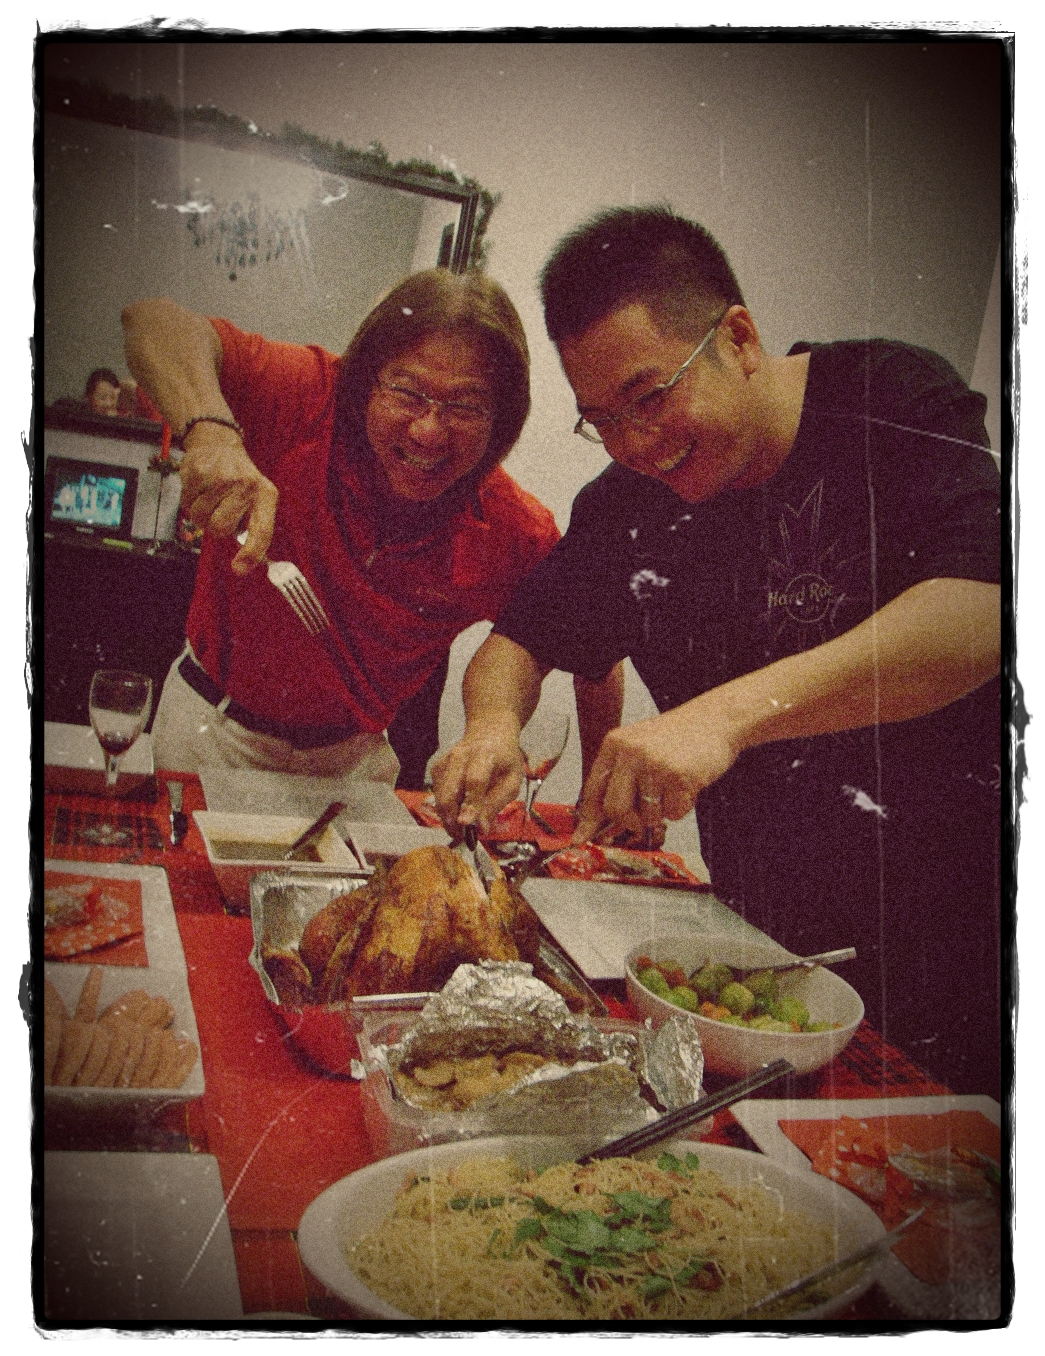
Oh here's one more; it's a pic of my dad (in red) and hubby trying to carve a turkey LOL. I just love reminiscing past Christmas memories :)


Anyway, I have much to be thankful for this Christmas, the highlight of my year is definitely my new venture into the world of crafting and scrapbooking which started early this year. I never would have imagined a simple exercise to make a baby album would lead me this far and unearth this hidden 'ability' to put paper and glue together which I never knew I had. I praise the good Lord for that :) Also, this lil' hobby of mine has brought me many wonderful friends and fellow crafters. I've made really good friends who are supportive, encouraging, inspiring and simply just WONDERFUL! Thank you amazing and talented fellow crafters, artists, scrappers and cardmakers for generously sharing your works of art, your techniques, your tutorials, your sources and supplies, EVERYTHING! And a special shout out to my ATC swap buddies *kiss*kiss* I'm just so blessed and I hope and pray you will have a lovely holiday and a joyous bright New Year ahead! :)


Blessed Christmas and tidings of comfort and joy to all! 
And to all a happy new year!

GOD BLESS

Friday, December 23, 2011

A Purple Card for CardPatterns #146

Here's another card which my sis-in-law requested for her dear hubby in celebration of his birthday and their anniversary. She requested for a photo scrapping inside so he can display it in his office so I created a large 5" x 8" card using CardPattern's Sketch 146.

A sweet purple family theme card.

Here's the awesome sketch:


Here are some close-ups and details;

Love the new Prima Powder Puff fabric bloom!

Chipboard heart painted with Martha Stewart's glitter paint.

Ali Edward's Technique Tuesday stamp.

Photo scrapping on the left and printed poem on the right.

Close-ups of embellishments on the photo page.

Thanks for visiting despite your busy holiday schedule... I'm pretty sure we're all rushing our last minute Christmas shopping, baking, wrapping and what more hehehe ... holidays are crazy huh??? Well, have a great preparation and enjoy your time with family and friends... I'd like to wish you all a Blessed Christmas and Happy Holidays my dear readers and followers! You guys are super awesome and deserve only the best Christmas ever :) GOD BLESS!

Wednesday, December 21, 2011

Mixed Media Layout & a Simple Tutorial

It's been such a long time since I've actually done anything for TCR, I always find color palettes so much more challenging than sketch challenges. But when I saw the soft blues from Palette #89 (His Room) I willed myself to give it a try although I had absolutely no mojo, and then I found Sketch #187 on Creative Scrappers and an idea started to form. Still, I didn't have the right colors and I guessed the only way around it is to go mixed media which is SO not my strong point, as opposed to my comfort zone of paper-crafting ... so I googled around and got inspired by this mixed media artist Ruby Claire and her amazing video tutotials. After watching some of her vids, I recalled that we did have a workshop on using tissue to create a textured background with Sharon of Scrappingville a few months back. What a great opportunity to put that into good use here :)

Here's The Color Room's Palette #89 (His Room):
 

Here's Sketch #187 on Creative Scrappers:


Here's the result of combining the two with some tips from the video tutorials...

This is a 12 x 12 layout on a plain blue cardstock which is decorated with tissue, gesso, acrylic paint, spray paint, gauze and a whole bunch of embellies. Below are some close-ups. Blooms are Prima. Clapper board chippie sticker from Bo Bunny.


Since this is not my usual style of creating a layout, I'm actually quite thrilled with it although I ended up with paint everywhere, on my clothes and the floor and the table LOL! Note to self to wear an apron!!! It was more of an experiment for me since I'm not so good at visualizing the end result of a mixed media project so I was pretty apprehensive along the way. I guess it turned out pretty ok albeit a little messy. Anyway I'm happy to share the steps I took here, let;s move on to the tutorial...

Firstly, we start with the background....

  1. Cover cardstock surface with Mod Podge using a brush
  2. Lay on a piece of white tissue (this was a recycled gift wrap! I'm so earth-friendly *beams* LOL!) Do not make it super smooth, we want lots of deliberate creases and folds, leave the edges of the cardstock uncovered or just tear along the edges.
  3. Stick on some torn and crumpled book pages (I should've used bigger sheets as they didn't show up much after the LO is done)
  4. Cover the book pages with gesso and sponge off lightly with paper towels
  5. Stamp on acrylic paint using bubble wrap
  6. Spray ink on selected areas, I tried masking with the butterfly but it didn't quite work out LOL!

Next, we'll move on to attaching the photos and embellishing.

  1. Cut matching pattern paper to be photo mats, distress the edges with ink and lay them over the bubble stamped and book pages area. I also placed some mesh netting ribbon under the photo mats. Add on a little bit more bubble wrap stamp over the pattern paper.
  2. Paste on photos.
  3. Add bits of torn corrugated sheet, gauze and some die cut flourishes.
  4. Punch a butterfly, distress with gesso and add on to part of the photo. Embellish with flowers over the gauze. Paste a strip of lace under each photo.
  5. I wanted to add a touch of a lighter blue, so I used a chalk ink pad and dabbed randomly around the layout.
  6. Decorate the butterfly and flower edges with a fine glitter glue. Add on buttons and gems under the main flowers. I also spritz on some blue glimmer mist around the embellishment clusters, just be careful not to spritz your photos! I kinda ruined the bottom left photo with some spritz! I used my hand to cover the photo, bad idea, will use a dry flannel cloth or paper towel in future.
Well, that's it! It's surprisingly quick to do this LO, except for the oh-so painful cleaning up process! Hope you find it helpful somehow :)

Thanks for visiting and have a nice day!

Tuesday, December 20, 2011

Cardabilities Sketch #45

Hello again! I'm back with a new card. I received a request from my sis-in-law to make a special "Thank You" card for her mum and she wanted some photos inside and a poem as well. So I created a 6 x 6 card that's also like a 'mini-album' some sort in order to incorporate her requirements... a mini album card LOL!


I used Cardabilities' Sketch #45 for the front of the card.


Here's how the mini album card look like from the side;


 Here are the insides of the card;

Cute baby Christabelle on the right and message space on the left.

A special poem for Grandma :)

Here are some close-ups;


Lotsa fussy-cut flowers.


Well, this is one of the more unique cards I've made so far. Big thanks to my sis-in-law for giving me the opportunity to create something so special for her mum. And thanks Cardabilities for the inspiring sketch!

Thanks for looking and have a nice day :)

Saturday, December 17, 2011

ATCs - Last Batch for the Year!

I've been working on these since November, finally completed the lot yesterday :)

This is my latest batch; The Scarlet Letter series. They are white canvas which are spray-misted on a mask. Then they are stamped and decorated with various embellishments.
There are 8 cards in this series.

I also made this batch yesterday, this is my Inky Blooms series. Similar to the Scarlet Letter series, they are white canvas which are spray-misted on a mask followed by stamping in different colors. Buttons are hand-stitched onto the canvas. There are 7 ATCs in this series.


This is another canvas series; Blooming Phrases; which I made in November, there are 3 ATCs from this series. They are canvas painted with acrylic and decorated with felt leaves, brads and buttons.


Next are 2 series with 2 ATCs each; Sophie and Mehndi. Sophie are the 2 pink and grey cards, they are just simple girly designs. Mehndi cards comprise fussy cut elements overlaid on a glittery tulle fabric.


The last 4 cards are random, there are from no particular collection or series. Just sudden inspirations which hit me and here they are;
4 random ATCs
My personal favorite. Hand-stitching, fussy cutting and doodling.

This ATC here is super special; made this during the week of my birthday last month :) A tribute to the year of my birth, note the oh-so-SEVENTIES hippie hypercolor yarn :) And torn book paper made into a medal, signifies my love for reading.

A tribute to my birth year :)

That's it for now, these are my precious ATCs! Hope my swap buddies will like them *fingers crossed*

Happy weekend everyone!

Sunday, December 11, 2011

Mini Album for my Baby Niece

My brother-in-law and his wife recently gave birth to a sweet lil' angel and we celebrated her full moon (one month old) party yesterday. My gift to them is a 6" x 6" 10-page mini album incorporating pictures of their baby girl which I downloaded off their Facebook album. The album is pretty much 95% complete with photos except for journaling spots which are left empty so they can personalize it with their own precious thoughts. The ring bound album is also flexible in such a way that they can add on more pages or mementos or re-position the pages.

I'm using American Craft's chipboard ring-bound album which is part covered in pink fabric. I've left the pink fabric exposed and covered most of the raw chipboard with pattern paper.

Album cover - Welcome baby Christabelle!!!

Side view; each LO is housed in a clear protector.
This is the inside cover. I included a nice poem I found online;

Inside front cover.
Close-up of the poem.

Here comes the inside layouts, they are basically full layout formats made on 6" x 6" cardstock or pp.

A poem on the front page.


Lastly, this is the inside-back-cover:

Isn't she simply ADORABLE??? Those huge eyes :)

I can't possibly list out each and every single supply used in this album but I'll mention a few notable collections; Fancy Pants Baby Mine 6x6 pad, Simple Stories Baby Steps 12 x 12 pp, MME Lost & Found 2 Blush 6x6 pad, Echo Park Country Road 6x6 pad, Webster's Pages Let's Celebrate Sweet & Treats 12 x 12, PP Nantucket Oyster Bar 12 x 12, PP Snow Day 12 x 12 (on the cover), 7 Gypsies Baby rub-ons.

I'm very excited with this album and had many hours of pleasure working on it. I think I spent around 3 weeks on it, I guess it would have been quicker if I had only one project at hand. I'm super pleased that they liked the album :) I think it's nice to have these precious pics all compiled and ready for showing to family and friends at the party. A satisfying and fulfilling project for me indeed, just to see the smiles on their faces makes me really HAPPY :)

Here's my sis-in-law, the pretty new mummy :)

Thanks for dropping by and looking :) Have a good week ahead!
 

Copyright © Myscrapspiration 2011 | All rights reserved | Blog Design by Krafty Palette.