Thursday, June 30, 2011

Stuck?! Challenge 15 June

It's so great how the sketches on Stuck?! are always so inspiring. Here's my interpretation of the June 15 sketch.

The June 15 Sketch on Stuck?!

An old photo taken at the zoo with my brother, cousins and god sister way back in '87. We used to do everything together the bunch of us :)
Using Crate Paper's Little Sprout collection here.


Misted with SC Mister Huey's Warm Calico and some MM Acrylic Paint in Manila.
Thank you for visiting! Have a nice day ahead!

Tuesday, June 28, 2011

The Color Room Challenge #64

Here's my layout for TCR challenger #64. The colors in this palette are really pretty and sweet (almost too girly!) and it would be a challenge to scrap a layout for a boy instead of a girl. So here's my take on it, trying hard not to make it too girly so I avoided flowers and butterflies this round.

TCR Palette #64

Yummy Thumb! My lil thumb sucking boy at around 5 months old.

Craft tag stamped and decorated with Crate Paper's Toy Box Stickers. Fan flowers are handmade.

Loving these cotton border trims which I bought from a knit shop!


Handmade flaglines :)

Materials used:
  • Patterned papers from Crate Paper Toy Box (yellow), Simple Stories 100 Days of Summer (red) & Pink Paislee's Daily Junque (pink)
  • Baby blue cardstock
  • Tag ("Remarkable" & "Unique") from MME's Stella Rose, 5" manila tag is Ranger.
  • Border stickers from Crate Paper Toy Box
  • Paper Artsy Numbers Stamp
  • MM Baby Enamel Metal Tiles
  • AC Pigment Ink Pad in Rouge & TH Distress Ink Pad in Aged Mahagony
  • Liquid Pearls in Baby Blue
  • Pink velvet trim bought from Papier, yellow and blue cotton trims from Lily Handicraft in Subang Parade.
  • Alphas are Pink Paislee's Sweetness (yellow). October Afternoon & Jenny Bowlin's mini alphas.
  • Random buttons and yellow thread

Saturday, June 25, 2011

No Patterned Papers!

I'm exceptionally proud of this page because I did not use a single printed patterned paper! I wanted to take my mists and stamps to the limit and challenge myself if I could come up with something decent without a single piece of store-bought patterned paper.

Hubby caught Lucas starring out the window with such intense concentration one rainy weekend afternoon. He shot this without Lucas realising it at all. Just shows how deep in thought he was at that point. Adorable!
This page was fun and challenging to create! I basically created my own 'patterned papers' using inks and stamps and scrunched-up paper.

Close up of the rather long title.

Close up of my home-made twine badges!

Handwritten phrase a little bit crooked, no thanks to lazy eye-balling rather than drawing some grid lines.
Materials used:
  • Studio Calico cloud clear stamps
  • Paper Artsy numbers cling stamp
  • Cardstock; craft cardstock for base, yellow and navy cardstock for accents
  • Plain white paper: I used the white paper that came with my scrapbook album, no waste!
  • Cotton twine; for hand-stitched border, accents and twine badges (bought from MPH)
  • TH Distress Ink Pads: Broken China and Stormy Sky (for stamping and distressing)
  • Tattered Angels Turquoise Blue and Artic Blue Glimmer Mist (for the homemade 'patterned papers')
  • Studio Calico's Mister Huey's Mist inWarm Calico (for background on the craft cardstock)
  • Prima flowers and pearls
  • Random buttons
  • EK Success scallop border punch
  • Alphas: AC and MM

The three hand-made 'patterned papers'.
Basic how-to:
  1. To make the paper on the left, scrunch up the white paper. Mist with TA Turquoise Blue Glimmer Mist. Allow to dry completely, then lightly brush with TH Distress Ink in Stormy Sky all over the surface and the edges. (used Inksentials ink blender tool) Lastly, sprinkle some TA Artic Blue (unscrew the bottle and lightly tap the nozzle)
  2. To make the paper on the right, stamp on clean white paper. Once the ink is dried, scrunched it up abit and mist lightly with TA Turquoise Blue (not too wet or the stamped images may smear). Then lightly brush with TH Distress Ink in Stormy Sky all over the surface and the edges. (used Inksentials ink blender tool)
  3. The last bit is really easy, just stamp, stamp and stamp and distress the edges using Making Memories edge scrapper tool.
  4. To make twine badges, cut up circles of the sizes you like, then smear with liquid adhesive (best to use Tombow Mono Multi as it works wet or dry and gives you room to wiggle). Let the adhesive dry (turns from white to transparent once dried). Roll the twine into a flat disc with your fingers, when halfway through, place it on the circle with the adhesive. Continue rolling till you cover the entire circle. Use abit more glue to seal the end bit. Decorate the centres with buttons, brads or whatever.

Friday, June 24, 2011

My Darling Valentine

I know it's not Valentine season now but I came across this old photo of me and the hubs taken on Valentine's Day two years ago. We were on a short weekend getaway across the causeway. It's one of those rare photos of me in glasses that actually don't look too bad (*vainpot* heehee). Here's the other thing; the hubs and I are quite strange in the sense that we both LOVE stuffed animals. I for one can't sleep without Mr Wooloomooloo my Koala and hubby just bought the Mumbles the baby Penguin from the Singapore Night Safari.

I'm so thrilled to be able to deviate from my baby theme now that the baby album is almost complete.
Time to get more adventurous!

I used the Collections Elements undressed chipboard as a mask for the misting, then I painted it in red acrylic paint and glazed with Glimmer Glam. The little hearts were scattered around the page. So fantastic nothing is wasted with this chipboard!

This brown lace ribbon is so delicious.

Here's another clsoe up.

Here's how I made the misted background; using the chipboard base as a mask.

Materials Used:
  • Cream cardstock
  • Pink Paislee's Sweetness patterned papers
  • Prima flowers and Prima crochet doily
  • Collection Elements baby Hearts Chipboard
  • Liquid pearls in Buttercup and Rouge
  • Curio brad
  • Tattered Angels Glimer Mist in Red Velvet
  • Tattered Angels Glimmer Glam in Rust
  • Thread and lace ribbon bought from Craft Haven
  • AC felt alphas and Pink Paislee's cardstock alphas
  • Yellow buttons from Pebbles
  • Red crystals from Prima

Wednesday, June 22, 2011

From Workmates to Best Babes

It's not very often that one finds great friends at the workplace, but I'm blessed to say I did and this page is a tribute to these lovely girls. We've shared almost a good three years of joy, tears, quarrels and of course endless hours of gossips over lunch and coffee. Even now that we've all left the old workplace, we still try to make a point to catch up every now and then. Back in the day, they were my daily remedy for the Monday blues, and I use 'Monday' loosely here ;)

Everything is Pink Paislee's Daily Junque, except for the fibres which are Momoyo. Alphas are AC and buttons are random from my stash.

I made these fan flowers from Scrap-A-Little's tutorial. Helen's got such amazing flower tutorials and she makes it so easy.

Made these little fans with toothpicks. Pardon the messy liquid pearls, clumsy fingers kinda messed them up abit :(
Oh and ACG stands for our ex-company; Alliance Cosmetic Group. The photo was taken at the office car park area.

I really love this line (Daily Junque), they are perfect for almost any theme! I have an entire paper pack of it to last me forever :)

Friday, June 17, 2011

My First Studio Calico Layout!

I was so excited to get Studio Calico's Paper Moon kit yesterday from Scrappin Studio, it's the first time I'm actually buying an actual coordinated kit and I must say it's so fun! It saves you the hassle of thinking how and where to get embellishments and papers that matches.

Here's what's in the kit, amazing right?

Image from Studio Calico.

I just could not wait to use that perforated rocket data paper, so cute! Here's my layout...

This was a quick and easy LO, however, apologies the photos are not very good as they are from my phone camera but I thought he looked as though he was strapped up in a rocket launcher! Haha.

Almost everything is from the kit including the crescent moon stamp and yellow pebble buttons. Exception are; the red cardstock and black alphas are from my stash. The stars are inked unto the page using a mask made from a mini star punch (bought at MPH). As for the rest of the materials:
  • Mist: Studio Calico Warm Calico
  • TH Distress Ink Pads Stormy Blue and Pumice Stone
The red and the Blast Off was inspired by one of Lucas favorite cartoons: Little Einsteins!


That's all for now .... Happy Friday and have a wonderful weekend!

Tuesday, June 14, 2011

My Sleepy Lil Angel

I think every baby's an angel when he or she is peacefully fast asleep! A soundly sleeping baby means there's time to go to the loo, take a shower or just take a break! Also, a sleeping baby looks so so so adorable :)

Here's my take on my sleepy angel at around five months old, inspired by the June sketch on Stuck?!
 

June Sketch on Stuck?!
I was so excited to find patterned papers that matches Lucas pyjamas! I wanted a sweet, pastel and soft color theme for to evoke a beautifully peaceful mood, because that's how we feel when Lucas is asleep :)
It's so wonderful how the various bits and pieces from different collections came together so perfectly on this page.
One stanza of the lullaby that I sing to Lucas regularly to rock him to sleep.

Materials used here:
  • Pink Paislee Parisian Anthology Papers
  • Hambly Screen Prints Rub On Wings
  • Lost & Found Pop Up Stickers
  • Making Memories Pitter Patter Lil Angel Sticker
  • Making Memories Pitter Patter Tags
  • Making Memorie Metal Sentiment 
  • Butterflies from Martha Stewart Royal Butterfly Punch
  • AC Fabric Thickers
  • Making Memories Tiny Alphas

Tuesday, June 7, 2011

The Color Room Challenge #61

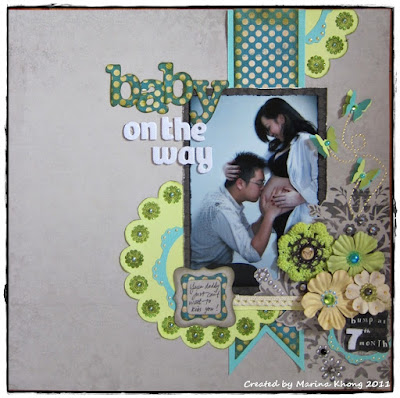
I'm playing along with TCR's pallete #61 for the very first time ever! I love this palette as it's not too girly (I don't get to scrap girly colors cos I usually scrap about my two boys!), so this color combination is simply perfect. I don't actually have anything that matches 100% exactly but I think what I have here comes  quite close.


Here's my interpretation of the pallete, I couldn't use the sketch as I'm working on a single photo and I wanted to make use of the grey Kaisercraft paper I have in my stash. I never would have imagined to use it this way. Thanks TCR for this fabulous inspiration!

The protruding green circle echoes the protruding baby bump!

Heart the Prima crochet doily! The BB Gabrielle butterfly brad goes so perfect with this.

Journal tag made from Slice.

Love the AC fabric thickers alphas!

Can't get enough of the MS Butterfly punch!
Materials used:
  • Papers: Kaisercraft After Five Curtsy, MME Stella Rose Gertie Friends Forever,
  • Embellishment: Prima crochet doily and flowers, Prima crystals and pearls, Bo Bunny Gabrielle Butterfly brad
  • Inks & Paints: TH Distress Ink Pad in Pumice and Peeled Paint, Sticklers in Baby Blue and Eucalyptus, Liquid Pearls in Baby Blue, Buttercup and Silver Pearl
  • Alphas: AC Fabric Aplhas in white, MM tiny alphas in Black, 'BABY' is cut from Slice using the Stella Rose paper.
  • Butterflies: Martha Stewart Royal Butterfly Punch
  • Stamp: Maya Road clear doily stamp
  • Die cut Shapes: all from Slice except the green circle which is traced from something else.
I really enjoyed playing along as I never imagined I could come up with this if it weren't for TCR. Plus, I got to use some of odd stuff I have in my stash.

Sunday, June 5, 2011

Spread Your Wings & Fly!

It's June already! Time flies; before you know it, Christmas will be upon us and another year is over!

Well, I'm glad this blog is now moving into it's second month of life. To kick off June I'd like to share my 'all things butterfly' layout. When I came across the Bo Bunny Gabrielle collection online, I couldn't wait to get my hands on it. I was ecstatic when I discovered that Craft Haven stocked almost the whole range; papers, embellishments etc, it was so fabulous ... I busted my scrap-shopping budget for the month (again!).

Here's my layout:

As you can see, the photo is most apt for this butterfly theme! I'm a total butterfly girl :)
I decorated the tag with Distress Ink Pads: Tim Holtz Aged Mahogany for the edges, Pumice stone for the butterflies and Tattered Rose all over. Butterfly designs made using Martha Stewart Royal Butterfly punch.

Another angle of the wraps and trim. I housed the date of the photo in a mini oval chipboard frame painted as per the chipboard trim. Alas, I can't recall where I got that oval. Flowers are Prima and brads are Bo Bunny Gabrielle.
So there's how I'm starting my June, I still have enough Gabrielle stuff for another two layouts I think. I aim to complete them within the month. Plus I'm also going to challenge myself to participate in more sketch challenges, that's pretty good reason enough to go stock up on supplies heehee :)
 

Copyright © Myscrapspiration 2011 | All rights reserved | Blog Design by Krafty Palette.